

Fitting instructions
DETAILED HOW-TO GUIDE
A brand new leather tree saddle may feel stiff and look high on the horse’s back. The saddle will soon settle with some riding. The aim of fitting the saddle is to to balance the seat so that it’s level and place the panels in the correct position for weightbearing and spinal/wither clearance.

PLACING THE PANELS
-
Your saddle comes with two lines of tape on the underside to indicate a default/starting position for the panels.
-
If it's difficult to sight the centre of the saddle, use tape to mark it.
-
Line the long straight side of the panel parallel with the tape, so that the panel runs along the lower edge of the tape (see image). Most saddles have straight lines of stitching that can be used as a guide. If yours doesn’t, use tape to make marks.
-
Do NOT stick tape to ANY leather/suede areas of the saddle; they will leave a permanent mark and if the saddle is sent back it will affect your return policy.
-
Start with a 4-finger channel at the rear of the saddle, and slightly fan the panels out at the front.
The beveled corner of the panel goes to the front of the saddle.

BALANCING THE SADDLE BEFORE RIDING
-
Put a towel on the horse’s back and place the saddle on it.
-
Make sure the girth straps hang vertically down, and line up with the horse's girth groove.
-
Girth up slowly, for most horses the rear girth strap should be 1 hole looser on both sides than the front girth strap.
-
Check that the seat looks level. If the seat is tipping forwards, you can move the panels closer together in the front, or move them further apart at the back, OR use shims inside the saddle pad.


-
If the seat is tipping back: move the panels further apart at the front or move them closer together at the back. If you narrow the channel at the back, make sure the panels are not sitting on the spine.
-
If the seat still tips back despite moving the panels to their max. width, you may need a SHIRE tree, or an English style saddle. See image below; this horse needs a shire tree saddle.
-
The standard width for the panels at the back is 4 fingers, but this can be adjusted according to the horse. Some horse's spinous processes are wide, some are not.
-
Check that the saddle clears the withers and spine. If it doesn’t (this is HIGHLY unlikely!), move the panels closer together along their entire length, or add a full length shim to the saddle pad . You will need to re-check after mounting as the saddle will lower with weight in it.

SADDLING UP TO RIDE
-
Take the saddle off and place the saddle pad on the horse with any shims that have been recommended, installed inside the pad.
-
Girth it up, check for balance, and do some groundwork. You will need to girth up more than once as the saddle warms up and starts to settle.
-
Please don't lunge your horse with the stirrups hooked up to the stirrup keepers of a Spanish saddle- this is very annoying to the horse!
-
Make sure to check the girth again when you get on, as it will loosen once your weight is in the saddle.
-
Do NOT mount from the ground at this point to avoid rolling the saddle with a girth that isn’t tight enough!! (It's not recommended to mount from the ground anyway for the horse's sake)
-
Use webbers or place the buckles of the stirrup leathers down by the stirrup.
Ride for a few minutes to check the balance of the saddle. Always make final assessments of the saddle balance with a rider on board. Check the girth frequently to begin with. You will learn which billet holes to girth up to over a few rides – take care in the beginning.
If you feel like you are tipping forwards/back: go back to step 6 to adjust the panels accordingly and/or change the shimming inside the pad.
FITTING THE RIDER
Spanish saddles have a flatter seat, and so there is more room for the rider to sit without weighting the cantle.
For English saddles, please ensure that you can lay your flat hand on the seat behind your glutes and that it fits in the space between the glutes and the top of the cantle, so that you are not putting weight on the cantle. This is true for all saddles, not just Hidalgo saddles. Sore backs on horses can easily be caused by the rider weighting the cantle, as it causes a huge amount of leverage pressure.
In this video, with Dr. Melanie Quick we show you the signs that tell us the saddle is the wrong size for the rider.
This video with Dr. Melanie Quick shows a saddle that is the correct size for the rider.
PANEL PLACEMENT
If you move the panels closer together or further apart, start with small increments of 1cm for each panel. A 1cm difference in position of both panels gives a 2cm difference to the overall fit - less is more. Always ride after an adjustment!
If you have moved the panels as wide as anatomically possible at the front, and as close together as you can at the rear, but the saddle still sits too high in front or along the entire length of it after riding in it, you may need a saddle with a wider “Shire” tree. The English style Hidalgo saddles do not sit as high at the front so that may an option too if the horse is very uphill rather than super wide. Please talk to us and we will assist.
SADDLE PAD TO HELP WITH CORRECT FIT
When a shim pad is required, Grandeur full- or half pads with appropriate shims are recommended to be used with Hidalgo saddles.
You can also use an existing saddle cloth (or make it a Mattes pad!) with our simple Pocket Pad to hold the shims.
NEED HELP? HERE'S WHAT WE NEED TO HELP YOU
We are here to help you set the saddle up and troubleshoot any issues. So that we can help you, please take and email us the following photos:
Please ensure the horse is standing square, with the head up in a natural position, and neck straight for all the photos.
Avoid bright sunshine as it creates shadows. If there are shadows or mane in the way, or the photos are not accurately taken, you may need to take new photos before we can help you.
1. Photo from the side. Make sure the mane isn't prohibiting a clear view of the withers, shoulders or the back.


2. Photo showing the withers on an angle. Lift up the mane from both sides so shoulders are well visible – use a hair tie if necessary.


3. Photo from above and behind: again, move the mane at the base of the neck out of the way.


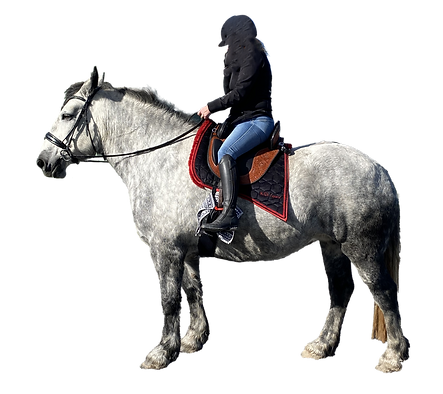
4. Photo from the side without a rider.

5. Photo from the side with a rider on

5. Include a ridden video if possible (around 1 minute is plenty).